Reaching for Stars Earrings
- Metal Maven
- Aug 23, 2020
- 3 min read
Updated: Sep 18, 2021
Here's a tutorial with photos showing you how to create a set of Reaching for Stars earrings using the Reaching for Stars Pressing.
I was able to finish all 5 pairs of earrings (including making the ear wires in less than 2 hours, so I’m definitely going to create more designs using this type of border with straight sides! 😊👍❤️


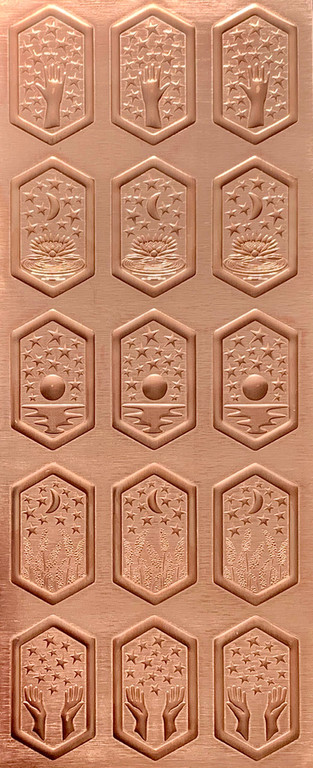
First, purchase a Reaching for Stars Pressing from Metal Maven
For this earring set, Metal Maven used 20-gauge metal.
This pressing is available in copper and sterling silver in different gauges on the Metal Maven website.
The pressing has five different designs. Each component is 1-1/8" Tall by 11/16" Wide. The earring designs are mirrored and the third copy can be used for a pendant.


Add patina to the whole pressing.
Use Liver of Sulfur to darken the entire pressing.
Sand the high spots.
Lightly sand the high spots using 1000 grit wet/dry sandpaper and then sand with 2000 grit sandpaper to finish.
Cutting out the earring and pendant designs.
A quick and easy way to cut the designs out is to use a guillotine shear. You can also use a Jeweler's Saw to cut out the designs.
File the edges.
Use a small benchtop belt sander to "file" the edges and round the sharp corners. Next, use a Jool Tool to smooth and polish the outside edges of the border
You can also use a file to smooth the edges of the of your piece. Use the flat side of a #6 half-round half-flat file.
Drill a hole for an earwire or jump ring.
Use a fine point Sharpie and mark where you are going to drill a hole just below the top peak of the inside border.
Tip: To keep your drill bit from ruining your piece, use a pointed awl or small nail to put a dimple in the center of your mark.
Lightly tap the end of the awl with a hammer to form a dimple. This step is to form a tiny impression so that your drill bit will stay centered and not dance around on the surface of your metal resulting in unwanted scratches.
Line up your drill bit on the dimple and drill a hole. You can also use a flex shaft to drill. To keep the piece from moving when drilling, hold it down with your thumb or fingers.
Deburring the Hole
After drilling, there will likely be some burrs on both front and back of your piece.
A handy way to easily remove the burrs is to use a round or tapered bur bit that is slightly larger than your hole. Hold the burr bit with your fingers and put the head of the bit against the hole and twist. Keep twisting until all of the burr is removed. This technique will leave a smooth edge around your hole.
Finishing Your Piece
Hand polish using a Sunshine polishing cloth (available at Rio Grande Jewelers Supply). Add a jump ring through the hole for a pendant and then put the pendant on a chain of your choice. For the earrings, follow the steps below for adding earwires.
Making Earwires using copper wire.
For the copper earrings, make some copper earwires using a handy little tool called the "Easy Ear Wires" tool. Open the earwire loop to the side and attach to the piece through the drilled hole. Close the open loop.
Tip: If you have Sterling Silver wire you can also make silver earwires using the same tool or purchase earwires from a jewelry making supplier like Rio Grande.

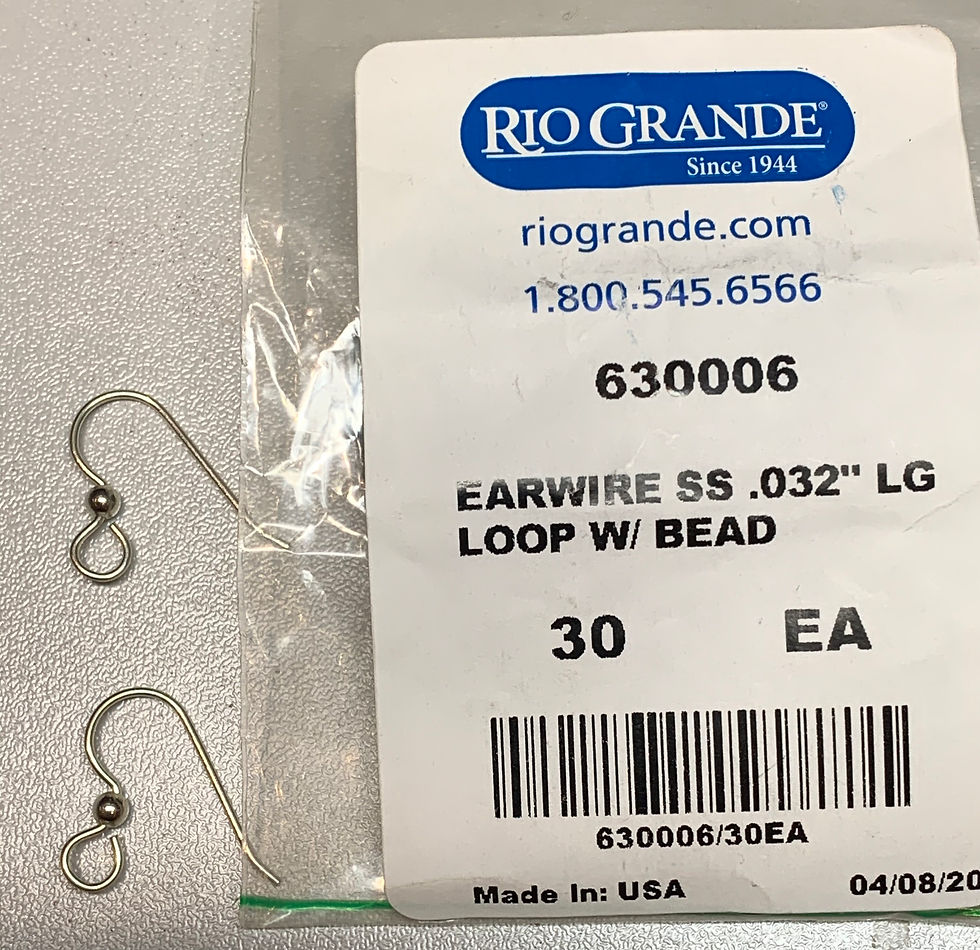
Adding the Sterling Silver Earwires
Metal Maven recommends using Sterling Silver earwires from Rio Grande. They are relatively inexpensive and allow you to market your earrings as being good quality as opposed to base metal earwires. Here are the ear wires used for these earrings.
Opening the earwires.
A good technique for attaching the ear wire loop to your piece involves opening the loop to the side instead of pulling it out from the ball. Grab a pair of chain nose pliers and hold the open end of the loop. See the photo below.

Now hold the earwire with your fingers and bend the loop towards you or away from you. The loop will look like the photo below if you have done it correctly. Next, put the open loop through the hole at the top of your piece. Using the pliers again, bend the open loop back into place. Be sure to face the front of the earring to front side of the earwire.


Comments