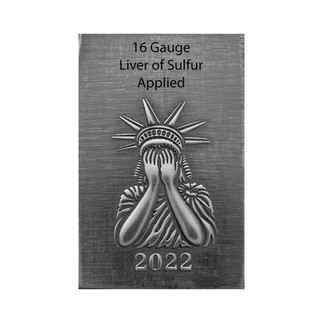
Crying Statue of Liberty Hydraulic Press Die
- Metal Maven
- Jul 14, 2022
- 3 min read
First, purchase one of our Crying Statue of Liberty Hydraulic Press Dies. Click on the photo below to go to the product details:
Protect Your Die:
This impression die is made with heat-treated tool steel and is for hydraulic press use only. It will work best with a press that is at least 20-tons. For best results, lightly oil your die before each use, always use dead soft metals, and use about 15-20 tons of pressure.
Use A Pusher:
Attach a magnetic pusher to the top platen your hydraulic press and make sure it is centered side-to-side and front-to-back. Then place your die with your metal and your 2mm craft foam on the bottom platen or the top of your stack of spacers, and center it under your pusher. You can find a 2" diameter magnetic pusher at Potter USA. The pusher they currently have available is shorter than the one pictured but it works the same way.
Pressing Your Piece:
Metal Maven used 16, 18, and 20 gauge dead soft copper, Fine Silver, and Sterling Silver when testing this die. She did not need to anneal, but annealing might help if you are not sure if your metal is dead soft. She also tested cutting out this die pressing using a 25mm X 18mm Pepe oval disc cutter, but you may use whatever size and shape disc cutter you would like. You will need to adjust the width of your metal if you plan to use larger sized disc cutters. Find the disc cutter she used here if you need to order one.
If you plan to use a 25mm X 18mm disc cutter, use a piece of metal that is about 1-1/2" long by about 3/4" wide. Allow the extra 1/8" to hang over the edge of the die. This extra 1/8" provides a tab that aids in removing the pressing from the die after it has been pressed.
Pressing Copper:
When pressing copper, cut a piece of 2mm craft foam the same size as the piece of copper used and place it on top of the metal before pressing. After the first pressing, use a new piece of craft foam that is the same size as the metal and rotate the die 180 degrees before pressing a second time.

Pressing Silver:
When pressing Fine or Sterling Silver, cut a piece of 2mm craft foam the same size as the piece of silver used and place it on top of the metal before pressing. After the first pressing, add another piece of craft foam on top of the first piece of foam that you already pressed and rotate the die 180 degrees before pressing a second time. If you have pre-used craft foam on hand from use with rolling mill dies, two layers of USED craft foam work well when pressing silver with our dies.
Add Patina:
After pressing you may add patina like Liver of Sulfur for copper pressings or Gosiba for silver pressings following the instructions on the labels.
We recommend using 240 grit Nail Salon Buffing Blocks after patina is applied to remove patina from the high areas on your pressing. You can find the brand of Buffing Blocks we use here.
Polish The Piece:
After buffing the surface with a buffing block, an easy way to shine the surface is to use a Sunshine polishing cloth. Lay the cloth on a flat surface, place your pressing face down on the cloth, and slide your piece back and forth across the surface for a nice hand polished finish.
Quick Release:
Here is a video that shows the quick release method for removing metal from the top of your hydraulic press die. You will need a rawhide, nylon, or plastic hammer for this tip.


Comments